Google Chrome is undoubtedly one of the topmost internet browsers to date. It provides excellent performance for high-end computer systems. Google Chrome is also compatible with weaker computer systems. Although its RAM consumption is a huge problem for PCs with RAM less than 3GB.
This is particularly painful if you try to open numerous tabs at once. Google Chrome is continuously being upgraded by Google. The company works hard to bring its users a synced experience when they use their Google account. This ensures that all the devices share the same history.
Now, let’s talk about the error at hand.

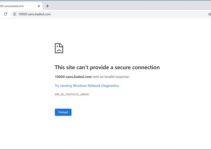
What is the ERR_CONNECTION_CLOSED Error?
The ‘ERR_CONNECTION_CLOSED’ error typically appears in web browsers when the browser is unable to establish a connection with the website’s server.
This error indicates that the connection was unexpectedly closed during the attempt. It is a common issue faced by users across various browsers like Google Chrome, Mozilla Firefox, and others.
Read Also:
Causes of the ERR_CONNECTION_CLOSED Error
Understanding the causes behind this error is crucial for effective troubleshooting. The ‘ERR_CONNECTION_CLOSED’ error can be attributed to several factors:
- Network Connection Issues: Unstable or weak internet connections can disrupt the communication between your browser and the website’s server.
- Server Problems: Issues on the server side, such as maintenance or overload, can lead to this error.
- Browser Configuration: Incorrect settings or corrupted files in your browser can prevent a successful connection.
- Firewall or Antivirus Interference: Sometimes, firewall or antivirus settings might block the connection to certain websites.
- Outdated Network Drivers: Outdated or corrupt network drivers can also cause connection issues.
How to Fix the “ERR_CONNECTION_CLOSED” Error
Here is our list of solutions to get rid of this error. Go through all of them carefully. Let’s get started!
Solution 1: Tweaking Internet and Chrome Settings
This particular solution has been recommended by a lot of experts online. It is also the one that has solved this issue for the maximum number of people. This is the reason why it is so high up on our list. Let’s have a look!
Step 1 – First of all, clear the browsing data on your Google Chrome. This can be done by clicking More tools option. Then, click Clear browsing data.
Step 2 – Next, in order to clear everything click “the beginning of time” option as your time setting and then select what type of data you have to delete. We personally recommend clearing cache and cookies.
Step 3 – Now, ensure to reboot your system and unplug the DSL internet cable or turn the Wi-Fi adaptor on and off before continuing.
Step 4 – In order to get rid of all your cookies, click on three dots again and click Settings. After that, click on Privacy and Security.
Step 5 – Next, open Site Settings. Then, click on Cookies and Site Data. Here you will see the list of all your cookies that remained despite deleting them in Step 1. Delete either all or just the ones related to the site that is not working.
Step 6 – At last, reboot your system and check if the error still persists.
Solution 2: Tweaking More Settings Using Command
Command prompt can be a very good friend when it comes to errors like this. This is because all you have to do is follow the steps given below and copy the commands correctly from this article and viola! Your problem will be solved and you will save your time.
Step 1 – First of all, type Command prompt into your search box. Then, right-click on it and click on Run as administrator.
Step 2 – Next, the command given below is the one you have to type in first. This will instantly resolve your issue. Ensure you reboot your system after running this command and then see if the problem is solved.
Step 3 – Now, the commands given below are supposed to be typed one by one and in the same order as they are given below. Press enter after typing. Reboot your system again after this step.
In case the commands given above failed to resolve your issue, you have to tweak some DNS address-related problems. Ensure you take a screenshot of your original settings so that you can go back to them in case something goes wrong.
Step 1 – First of all, type Network and Sharing Centre within the search box. You can also right click on the network icon present on the taskbar. Then select Open Network and Internet Settings option.
Step 2 – Now, click on Change Adaptor Options. Then, right click on the connection that you are currently using for accessing websites and click on Properties.
Step 3 – Next, move to Internet Protocol Version 4 and then click on Properties once again. Then, click on Use the following DNS server addresses option and then type 8.8.8.8 as your Preferred DNS server and 8.8.4.4 as your Alternate DNS server.
Step 4 – Ensure that the Validate settings upon exit box is checked. Then, click OK.
Solution 3: Scan Your Computer for Malware
Malicious programs can also affect applications that are installed on your computer as well as your internet connection. Some of the users who struggled with this error reported that their systems were infected when they initially started encountering this error.
They stated that they managed to fix this issue by getting rid of this malware. We personally recommend you to use Malwarebytes anti-malware as it is a very effective and free tool.
Step 1 – First of all, download Malwarebytes anti-malware from its official website. Then, run the executable file in order to install Malwarebytes anti-malware app on your system.
Step 2 – Now, open the antivirus. Then, open Settings that are present on the left side of your screen. After that, navigate to the Protection tab.
Step 3 – Turn on the toggle for Scan for rootkits option in order to find everything that can possibly cause errors within your Google Chrome. Then, scan your system using Threat Scan.
Solution 4: Disable Antivirus/Firewall
Firewall/Antivirus is one of the most important security apps when it comes to your system security against malware. However, at times these apps can also interfere with the normal functioning of a genuine app and can cause issues within your system.
The firewall/antivirus can mark quarantine Chrome also known as false positive. This do not let the communication to pass through. It is surprisingly a very common occurrence and can be resolved within a few days once discovered by developers.
In order to ensure that this isn’t happening with you, disable the antivirus or Firewall temporarily and see if the error disappears.
Solution 5: Disable Data Saver/Liye Mode (Mobile)
In case you are using Google Chrome on your mobile phone then disabling your data saver can also solve this issue. The data saver mode attempts to cut down the traffic by blocking unnecessary traffic that is not required.
However, there have been reports that this mode often disturbs the operation of Google Chrome. Follow the steps given below on your device –
Step 1 – First of all, launch Google Chrome on your mobile phone. Then, click on the three dots present on the top right corner of your screen. After that click on Settings option.
Step 2 – Then, navigate down till you find Lite Mode option and then click on it. Within the Lite Mode settings, turn off the toggle in order to to close Lite Mode.
Alternative Solutions
Certain users reported that they were able to fix the error by simply resetting their Google Chrome.
Step 1 – First of all, click on the three dots to open menu. Then go to Settings >> Advanced >> Reset & Clean Up >> Reset.
Step 2 – Reboot your system and check if the error has been fixed.
Furthermore, ensure that the time and date settings on your system are correct as Google Chrome will not work unless your time and date match your location.
To solve this simply right click on time showing on your taskbar and then click on Adjust date / time. You can now use the Set time automatically to take care of the rest. If none of the solutions mentioned above worked for you, try uninstalling and then re installing your Google Chrome.
Read Also:
Conclusion
That’s all we have on this subject. All of the solutions mentioned in our article are extremely easy to carry out. All you need to do is go through the given instructions carefully and follow them step by step. Ensure to take backup of any essential data in order to safeguard it in the case of data loss.
At least one of the solutions will definitely solve this issue for you. We hope this article saved your day. Thank you for reading!

